In the first step we model the cavity and the beam-pipes. We do this by specifying a polygonal description of the boundary in the r-z-plane. The inputfile that describes the boundary is:
#
# Some helpful symbols:
#
define(EL, 1) define(MAG, 2)
define(INF, 1000)
#
# We define symbols that will be used to describe our cavity:
# The names of the symbols can be up to 32 characters long,
#
define(OuterRadius , 46.23e-2/2 )
define(InnerRadius , 13.00e-2/2 )
define(GapLength , 27.60e-2 )
define(CurveRadius , 0.585e-2 )
define(BeamPipeRadius, 14.17e-2/2 )
define(TaperLength , 13.2e-2 )
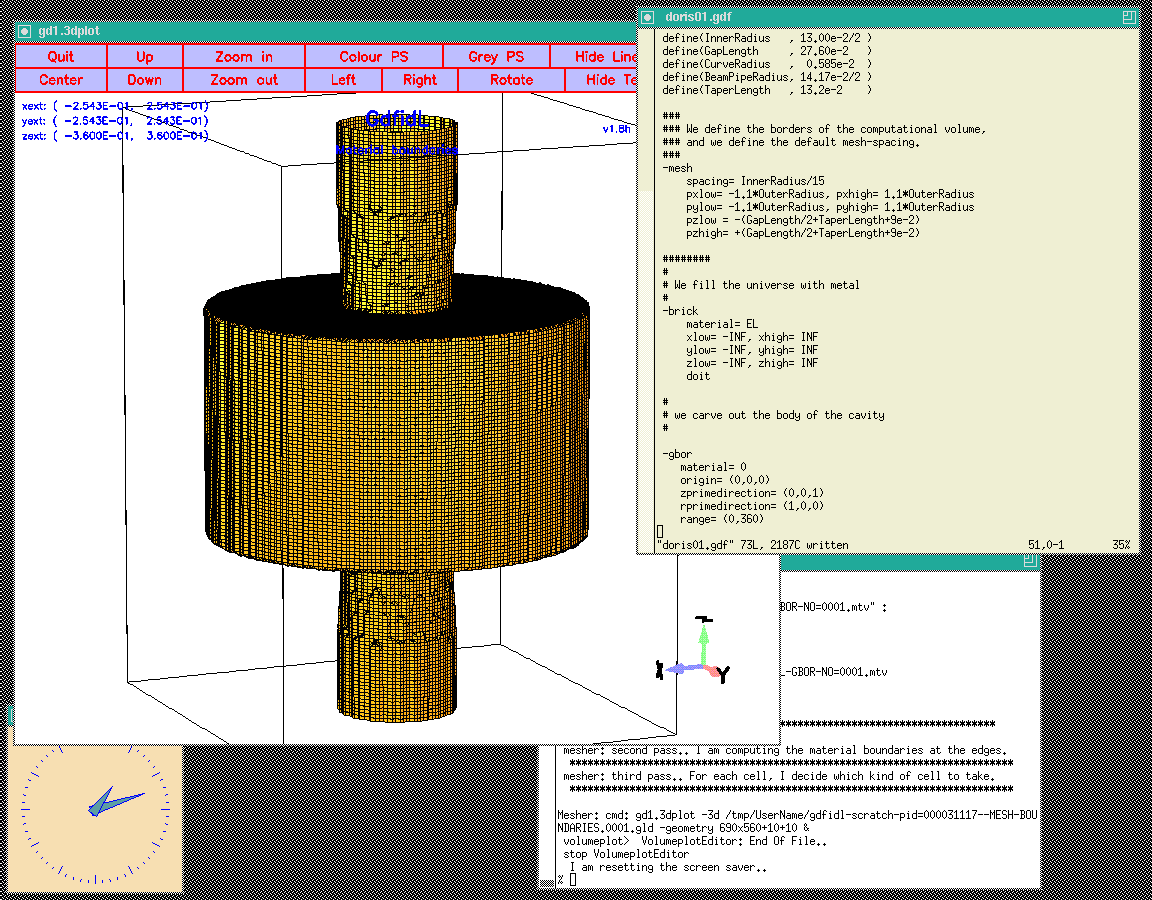
-brick
material= EL
xlow= -INF, xhigh= INF
ylow= -INF, yhigh= INF
zlow= -INF, zhigh= INF
doit
#
# we carve out the body of the cavity
#
-gbor
material= 0
origin= (0,0,0)
zprimedirection= (0,0,1)
rprimedirection= (1,0,0)
range= (0,360)
clear # clear any old polygon-description
# point= (z,r)
point= ( -(GapLength/2+TaperLength+10e-2), 0 ) # p1
point= ( -(GapLength/2+TaperLength+10e-2), BeamPipeRadius )
point= ( -(GapLength/2+TaperLength ), BeamPipeRadius )
point= ( -(GapLength/2+CurveRadius ), InnerRadius )
arc, radius= CurveRadius, size= small, type= counterclockwise
point= ( -(GapLength/2 ), InnerRadius+CurveRadius )
point= ( -(GapLength/2 ), OuterRadius )
## crossing z=0 plane
point= ( (GapLength/2 ), OuterRadius )
point= ( (GapLength/2 ), InnerRadius+CurveRadius )
arc, radius= CurveRadius, size= small, type= counterclockwise
point= ( (GapLength/2+CurveRadius ), InnerRadius )
point= ( (GapLength/2+TaperLength ), BeamPipeRadius )
point= ( (GapLength/2+TaperLength+10e-2), BeamPipeRadius )
point= ( (GapLength/2+TaperLength+10e-2), 0 )
show= now
doit
-volumeplot
doit
This inputfile can be found as "/usr/local/gd1/Tutorial-SRRC/doris00.gdf".
When we feed this file into gd1 via the command
"gd1 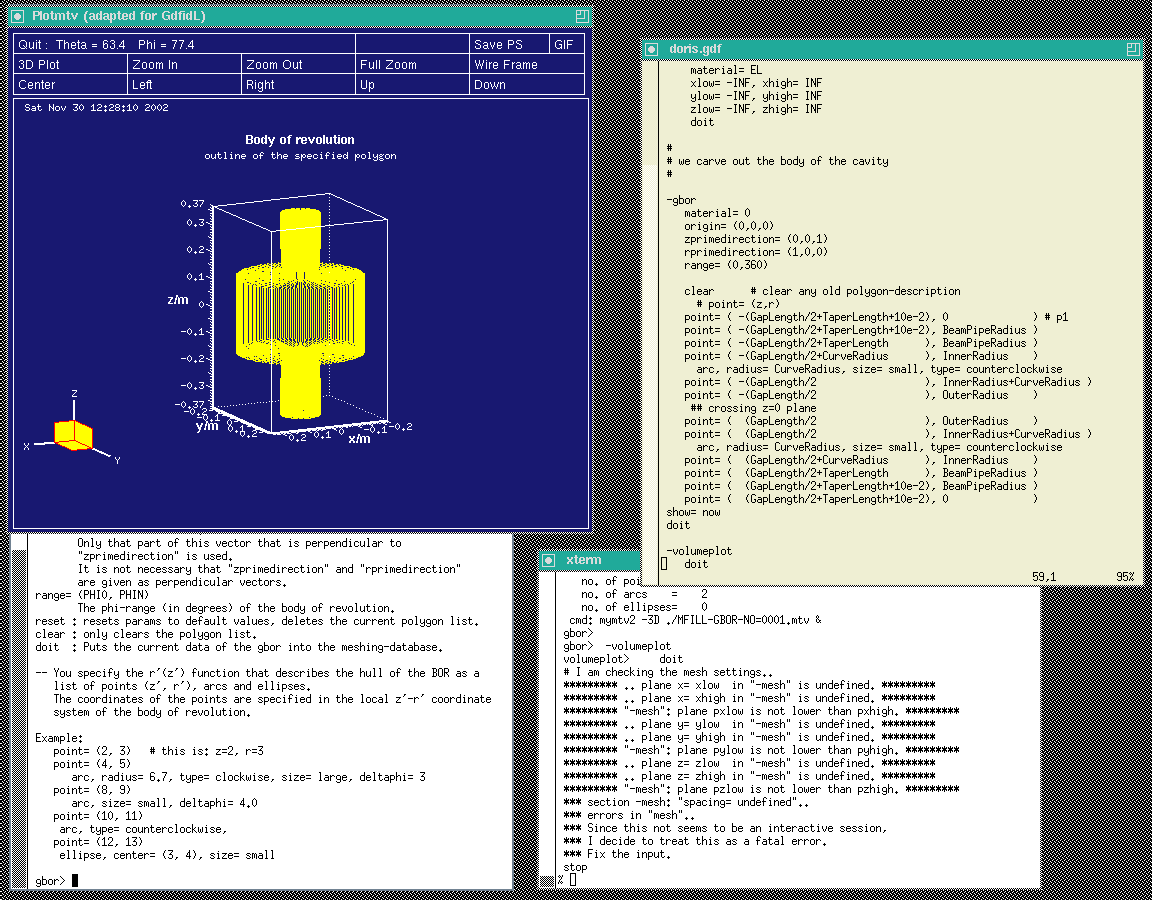 |
gd1 does not what we want, we do not get a "volumeplot", although we requested one. But gd1 gives us a hint what we made wrong:
 volumeplot>     doit
 # I am checking the mesh settings..
   .. plane x= xlow  in "-mesh" is undefined..
   .. plane x= xhigh in "-mesh" is undefined..
   .. plane y= ylow  in "-mesh" is undefined..
   .. plane y= yhigh in "-mesh" is undefined..
   .. plane z= zlow  in "-mesh" is undefined..
   .. plane z= zhigh in "-mesh" is undefined..
 *** section -mesh: "spacing= undefined"..
 *** errors in "mesh"..
 *** Since this not seems to be an interactive session,
 *** I decide to treat this as a fatal error.
 *** Fix the input.
 stop
When we say "doit" in the section "-volumeplot", gd1 tries to generate the mesh. But in order to generate the mesh, gd1 needs to know
To give gd1 the needed information, we change our inputfile. We insert the following lines somewhere before "-volumeplot":
 ###
 ### We define the borders of the computational volume,
 ### and we define the default mesh-spacing.
 ###
 -mesh
     spacing= InnerRadius/15
     pxlow= -1.1*OuterRadius, pxhigh= 1.1*OuterRadius
     pylow= -1.1*OuterRadius, pyhigh= 1.1*OuterRadius
     pzlow = -(GapLength/2+TaperLength+9e-2)
     pzhigh= +(GapLength/2+TaperLength+9e-2)
The so edited inputfile can be found as
"/usr/local/gd1/Tutorial-SRRC/doris01.gdf".
When we feed gd1 with this inputfile (gd1 ![]() doris01.gdf)
we get a screen similiar to the one shown in figure 1.4
doris01.gdf)
we get a screen similiar to the one shown in figure 1.4
 |
